FRS Pros Blog
Take Control Over Your Facebook Security Settings and 2FA
Whether you love, hate, or are just indifferent about Facebook (no judgement here), it’s worth configuring and locking down your account to control what others can see about you.
Facebook is front and center when it comes to privacy-related issues worldwide, so in this blog we are going to discuss how you can take control of your personal information. This post will also serve as an excellent starting point for anyone who doesn’t understand 2-factor authentication.
First, let’s log in to Facebook on a computer to manage the bulk of the security settings.
Making Sense of Facebook’s Security and Privacy Options
Log in to Facebook.com and click the little down arrow on the top right. Then click Settings. If you ever get lost during this guide, you can get back to where you need to be by coming back to this point.

We’re going to spend quite a bit of time here. Let’s start with a little general housekeeping.
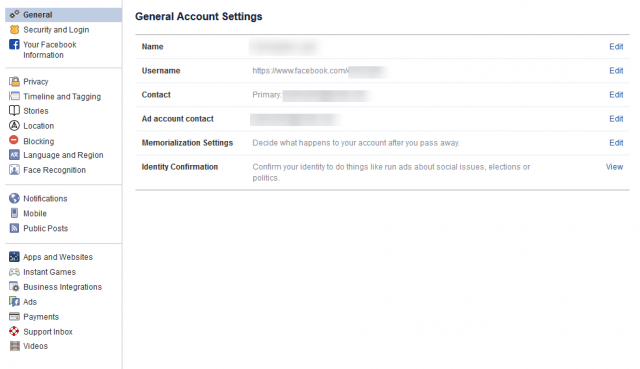
Verify the General Account Settings are Correct
Make sure you own and control all of the email accounts tied to your Facebook account. This is just good practice for all of your online accounts - every ecommerce site, every social network, every service you sign up for - if any account is tied to an older email address that you don’t check anymore or don’t have access to, you’ll have a hard time getting back into the account if something were to happen.
Security and Login - Find Out Where You’ve Logged into Facebook
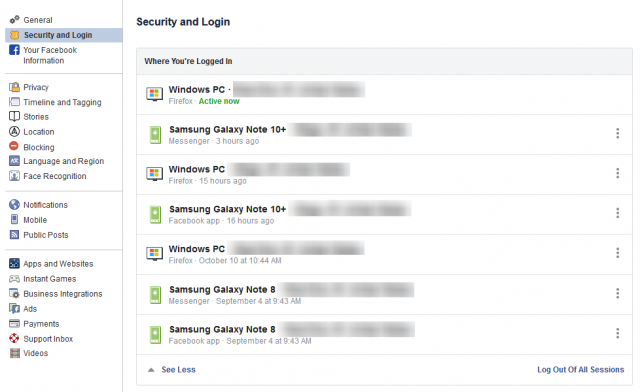
Click Security and Login on the right.
First, Facebook will show you all of the recent devices logged into your account. It will show you approximately where geographically the device was, the browser used, and when it was last active. Obviously, if you see something suspicious here, you should change your password right away (the options for that are directly below). Additionally, you can click the 3-dot icon on the right next to any login and log that device out.

If It’s Been a While, Take a Moment to Change Your Password
While we’re here, it wouldn’t hurt to create a new Facebook password. You should consider doing this across all of your accounts regularly (at least every 6-to-12 months, but more often for critical accounts like your bank and email).
Just as a reminder, you can get there by clicking on the down arrow on the top right of Facebook, going to Settings, and clicking Security and Login.
Make sure to never use the same password for two different accounts online.
Enable Two-Factor Authentication
Directly below the password options are settings for two-factor authentication (2fa). This adds additional security to your account in case your password gets stolen. Select Use two-factor authentication and click edit. Facebook will take you to a page that walks you through setting it up. From there, click Get Started.

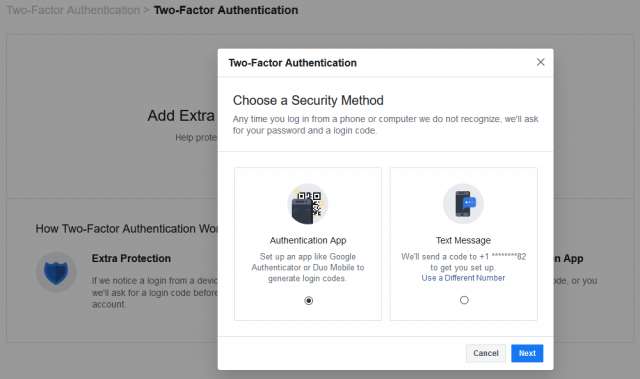
You will be given two Security Methods. We recommend understanding both options before choosing one:
Option 1 - Authentication App - This lets you use a third-party authentication app like Google Authenticator or Duo Mobile to generate the login code. This is a little bit more secure, but it does require you to have access to the mobile device that the authenticator app is installed on.
To set this up, open the Google Authenticator or Duo Authenticator or LastPass Authenticator on your mobile device. It makes the most sense to use the authenticator app that you use for other accounts, but if you don’t have one, and you have a Google account, use Google Authenticator.
Then, from Facebook on your computer (see the above screenshot), select Authentication App and click Next.
Facebook will give you a square barcode called a QR code to scan. In your Authenticator App, add a new account (typically there is a + icon to tap) and scan the QR code. Once scanned, the app will generate a 6-digit number to use. Facebook will ask for a Confirmation Code. Type in the 6-digit number and you’ll be set.
Option 2 - Text Message - Facebook will send a code to your phone number. You’ll want to make sure your phone number is accurate and can receive texts. This isn’t as secure as using an authentication app, because it is technically possible for a hacker to intercept your text messages, but it’s definitely better than nothing.
Setting this up is simple, once you choose Text Message and click Next, Facebook will text you a code. Type that code into Facebook and you’ll be set.
Depending on the option you choose, Facebook will walk you through the next steps to verify and enable two-factor.
Add a Backup
Once two-factor authentication is set up, Facebook will give you an option to Add a Backup. If you choose to set up two-factor with an Authentication App then Facebook will allow you to set Text Message 2FA as a backup, and vice versa. It’s not a bad idea to set up the other method as well, just in case.
Lots of online accounts offer 2FA, and some of them (like Google, Microsoft, and Amazon) will give you backup options as a way of giving you an alternative way in in case your primary method of 2FA isn’t available. Let’s say you were using text messages for your 2FA and you get forced into a situation to change your cell phone number. You’d be in a difficult situation if you didn’t have a backup option.
Facebook also lets you grab Recovery Codes (by the way, Google does this too, so if you have a Google account or use Gmail, it’s a good idea to get all of this set up over there as well).
Back on the Two-Factor Settings page, under Add a Backup, there is an option for Recovery Codes.
Click Setup, and Facebook will pop up a window telling you about recovery codes, and click Get Codes.
Facebook will give you 10 recovery codes that you can use in an emergency to get back into your account. These codes basically work as one-off 2FA codes, so you’ll need to know your Facebook password and one of these 10 codes to get back into your account.
Remember, these recovery codes can only be used once. You can request 10 new codes at any time by going back to the Two-Factor Settings page, but you can’t use the same code twice. It’s also very important that you keep them in a safe place, but not make it clear to anybody what they are. Write them down on an index card with a big “F” written in the corner and keep it in your wallet.
Setting Up Extra Security
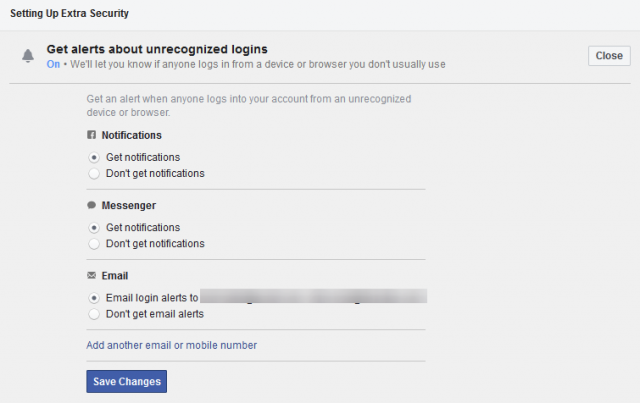
Back in the Security and Login area of Facebook’s Settings, scroll down to Setting Up Extra Security.
This area allows you to get alerts sent to you when a new device or browser is used to log into Facebook. It’s pretty straight forward, you can even define additional email addresses if you want. You can also have those notifications sent to you via Facebook Messenger, SMS, or as a Facebook notification. We definitely recommend at least having it set up to email you.

Below that option, you can choose 3 to 5 Friends to Contact if you get locked out. If you set this option up, make sure you only put in people you can trust. Also, it might be a good idea to only add a contact who you feel takes their security seriously. Otherwise, turn off this option.
We realize this has been a lot, but by setting up 2FA and controlling who and what device has access to your Facebook account, you are taking a big step in controlling your online identity. We encourage you to take time to review all of your social media, bank accounts, online shopping accounts, email accounts, and other services you are signed up with to prevent unauthorized access.
Our next Facebook article will be about protecting your privacy, so be sure to follow our blog for more tips and best practices for protecting both your personal identity and your business!


